How To Colourise A Black & White Photo
 |
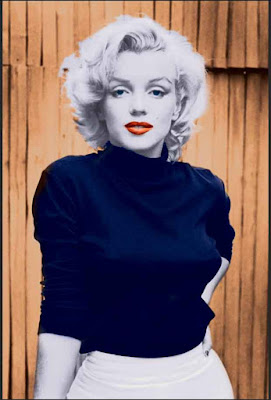
| The photo before and after it is colourised |
This article will teach you how to colourise a black and white photo using Photoshop in 7 simple steps. Some amazing results can be achieved using this relatively simple colourisation process. You can turn relatively dull black and white photographs into stunning full colour images in just a few minutes.
So let's get started colorising your black and white photos now!
Step 1: Open your black and white photo or image in Photoshop
Ok, so this is a nice and obvious first step. Simply open Photoshop then click on File in the top left corner of the screen and on the drop down click on Open. Then in the window that opens, navigate your way to your chosen image, select it and open it in Photoshop.Step 2: Convert the image mode to CMYK
 |
| Convert the image to CMYK Color Mode |
This process can be done in RGB but as the image you are editing likely started out as a print and in case you want to print it out after it is colourised it is best to edit in CMYK mode. So just click on Image > Mode > CMYK Color and Click OK to Confirm Conversion if prompted.
Step 3: Duplicate the layer
 |
| Duplicating the layer |
This is just a precautionary step in case you accidentally make a mess of your image! This way we will be editing the duplicate layer and your original black and white image is safe and sound. There are numerous ways to duplicate a layer in Photoshop, the most obvious being the one shown above - click on Layer > Duplicate Layer, then name the layer in the pop up window. Crtl + J is the keyboard shortcut for duplicating a layer in Photoshop.
The process of taking snapshots will be key to this process. If you are not familiar with this process, it simply involves clicking the little camera icon on the history window in Photoshop. What this does is take a digital "snapshot" of the current history state of the layer, we will use this to store different colours which we will then use to "paint in " the original black and white image using the history brush.
This first snapshot,shown above, is another precautionary step here, really a bit of practice as we won't actually use this particular snapshot later on. However you may use it for your own image, especially if you want to retain some areas of black and white.
Step 5: Creating the skin colour snapshot...
So we'll start with creating the colour for the skin. As explained already, we will be creating a colour, storing it in a snapshot then using the history brush to paint it on the relevant areas later on. |
| Select the Cyan layer in the channels window then edit the brightness and contrast as shown |
First of go to Channels and select just the cyan layer as shown above.
Then in the top menu bar click Image > Image adjustments > Brightness/Contrast and input a value of 85 Brightness and 25 Contrast. Obviously you can use different values to achieve different skin tones.
Then, back in the channels window select the CMYK layer to see the skin colour, as shown below. If you are not happy just select the Cyan layer again and edit the values until you are happy.
Now, most importantly, we store this colour for later use by taking a new shapshot from the history window, rename the snapshot "Skin" so we know what we want it for later on.
Step 6: Create the other colour snapshots...
The process for creating the colours for the other areas we want to colour is slightly different but even easier. The areas we need different colours for are Hair, Background, Lips (nail polish too), Eyes, Jumper and Skirt.
For each area we want to colour in we will go to Image > Image Adjustments > Hue & Saturation and edit the values to achieve the colour we want. Then save that colour in a snapshot.
For the hair go to Image > Image Adjustments > Hue & Saturation and choose the following values hue of -43, saturation of 61 and lightness -5.
For each area we want to colour in we will go to Image > Image Adjustments > Hue & Saturation and edit the values to achieve the colour we want. Then save that colour in a snapshot.
Feel free to use different values to the ones I outline below but be aware that each colour change is an edit of the one before so if you change one then all will require different values.
For the hair go to Image > Image Adjustments > Hue & Saturation and choose the following values hue of -43, saturation of 61 and lightness -5.
Then take a new snapshot in the history window and rename it hair.
For the background go to Image > Image Adjustments > Hue & Saturation and choose the following values hue of -20, saturation of 15 and lightness of -15
Then take a new snapshot and call it background
 |
| Keep building up the snapshots of the different colours making sure to name each snapshot as you go along |
For her lips values of hue -15, saturation 72 and lightness 10. Which should create a rosy red/pink.
Take a new snapshot, call it lips. We will use the same colour for her nail polish.
For her eyes values of hue -155, saturation 70 and lightness 5. Which should create a nice sea blue.
Take a new snapshot, call it eyes.
For her jumper values of hue -20, saturation 100 and lightness 20. Which should create a navy blue.
Take a new snapshot, call it jumper
And finally for the skirt values of hue 0 saturation -50 and lightness 0. Which is just a plain white.
Take a new snapshot, call it skirt
Select the last screenshot layer (skirt) then click the checkbox in front of the layer above (jumper), which will show the history brush icon, as shown in the image below. This will allow us to paint the colours saved from the jumper snapshot layer onto the skirt layer (which we'll use as our base).
For accuracy you can use the magic wand selection tool to select the jumper area and use then use the history brush tool to colour it in as shown above. Cool, right!
We will repeat this process now for the other areas of the image.
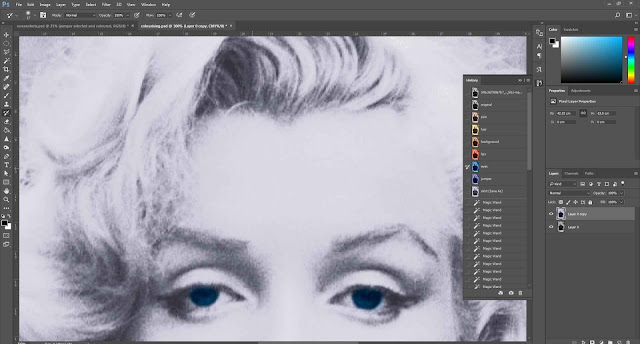
Now click in the box in front of the eyes layer, again select the area you want to colour using an appropriate selection tool and then use the history brush to colour it in.
Next the lips, once again select the box on the relevant snapshot, select the area to be coloured in then use the history brush to colour it in.
Now the background...
Finally the hair and the skin...
You can go back through the snapshot layers again in any order to tidy up or re-colourise any areas which require it. You can also edit the image overall using any image adjustment technique you want, or use an adjustment layer to test out a variety of edits. In the final image below I used brightness and contrast to lighten the image overall. That's it, all done. You are now ready to start colourising your own black and white photos.
Take a new snapshot, call it skirt
 |
| All the snapshots have now been taken |
Step 7: Colourising...
OK, so that's all the preparation done, now for the fun part, coloring in! You can do this in any order really but I prefer to start from the bottom and work up.Select the last screenshot layer (skirt) then click the checkbox in front of the layer above (jumper), which will show the history brush icon, as shown in the image below. This will allow us to paint the colours saved from the jumper snapshot layer onto the skirt layer (which we'll use as our base).
 |
| It helps to select the area you want to colour in first, in this case the jumper. |
We will repeat this process now for the other areas of the image.
Now click in the box in front of the eyes layer, again select the area you want to colour using an appropriate selection tool and then use the history brush to colour it in.
 |
| Colourising the eyes in the black and white photo |
Next the lips, once again select the box on the relevant snapshot, select the area to be coloured in then use the history brush to colour it in.
 |
| Adding colour to the lips in the black and white photo |
Now the background...
 |
| Our black and white photo is no mainly colour |
Finally the hair and the skin...
 |
| The black and white image is now full colour |
You can go back through the snapshot layers again in any order to tidy up or re-colourise any areas which require it. You can also edit the image overall using any image adjustment technique you want, or use an adjustment layer to test out a variety of edits. In the final image below I used brightness and contrast to lighten the image overall. That's it, all done. You are now ready to start colourising your own black and white photos.
 |
| The completed colourised image |
How To Colourise A Black & White Photo
 Reviewed by Opus Web Design
on
June 23, 2017
Rating:
 Reviewed by Opus Web Design
on
June 23, 2017
Rating:


