Create a Space Scene Using Photoshop Brush Tools
 |
| The completed space scene |
1. Create a new file by going to File-> New and set the file size to 700 pixels wide and 500 pixels high (other sizes can be used).
2. Use the paint bucket tool to fill in the canvas layer in black.
3. Next create a new layer by going to Layer-> New-> Layer, call the layer 'Planet'. The layer will appear in the layers window above the background layer.
4. With the planet layer still selected use the elliptical marquee tool to create a circular selection (hold down shift for a perfect circle).

5. Now use the paint bucket tool to fill in the selection, any colour is fine, I used yellow. When the circle is filled deselect by going to Select-> Deselect or hold Ctrl + D.
6. With the planet layer still selected, go to Layer-> Layer Styles-> Blending Options. Select Bevel & Emboss and tick Contour on. Set the Depth to 100%, the size to 250px and Soften to 16px (Other values can be tried out). Move the angle setting closer to the centre, as in the image below.

7. Now click on outer glow and set the blend mode to normal, the colour to a light yellow, the spread to 5 and the size to 150px as in the image below (again, other values can be tried out). Click OK to confirm the changes. That will complete our work on the planet layer for now.

8. Next create a new layer by going to Layer-> New-> Layer. Call this layer 'Rings'. The layer should be the top layer in the layers window but if not, select it and drag and drop it to the top.
9. Now use the elliptical marquee tool to make an elliptical shape across the planet, don’t try to be too accurate it can be easily moved and resized afterwards. While still on the elliptical marquee tool switch the setting to subtract from selection. See the image below.


10. Next use the paint bucket tools to fill in the selection. Any colour can be used, I chose brown. Now deselect the rings, move them into a position you are happy with using the move tool and even rotate, resize, stretch or shrink them by going to Edit-> Free Transform. I slightly rotated my rings.
11. Next use the Eraser tool to remove the back section of the rings to make it appear as though it is going behind the planet, as shown in the image below. To add some style to the rings you can add a gradient overlay by going to Layer-> Layer Styles-> Blending Options. In the pop up window select gradient overlay and choose any colours and options you like the look of, I chose a brown to light brown linear gradient. That completes our work on the rings layer.


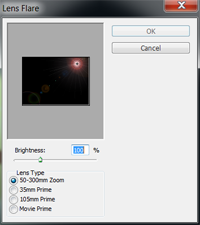
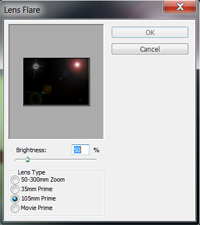
12. Next we are going to use the Lens Flare tool on each layer. First I used it on the planet layer to add a highlight to the planet suggesting light is emerging from behind it, as seen in the first image below. Next I used it in a different way on the background layer to create the appearance of distance stars. Try out different sizes and different placements in your image.

13. For a little touch use the smudge tool to drag a 'tail' on one of the small lens flares creating a shooting star effect.

14. If you are happy you can leave it at that but for some extra detail you can duplicate the planet layer by selecting it and going to Layer-> Duplicate Layer and then move it and resize it using Edit-> Free Transform. You can then change the colour easily by going to Image-> Adjustments-> Hue and Saturation and changing the Hue.
Create a Space Scene Using Photoshop Brush Tools
 Reviewed by Opus Web Design
on
November 26, 2013
Rating:
Reviewed by Opus Web Design
on
November 26, 2013
Rating:
Reviewed by Opus Web Design
on
November 26, 2013
Rating:


