My First 2D Game in UE4: The enemies
 |
| Enemies and Health Bar |
In this tutorial we are going to create an animated enemy duplicating the blueprint that we have used for our moving platforms. If you haven’t followed the tutorial about the Moving Platforms you could need to review those steps first. We are going to create our first flipbook animation in Unreal Engine, and you will need to have a sprite sheet of your enemy ready to import to the engine. A sprite sheet is a series of images combined into a larger image in a way that every individual image would represent a small movement respect to the previous one. We are also going to create a very basic HUD for our level to be able to see the damage that our enemy is causing in our character. We will also add some coding to our character blueprint and to our level to make all this work.
Creating a flipbook
| Sprite Sheet |
Assuming that you already have your sprite sheet ready (make sure every individual cell has a power of two dimensions) we are going to Import our sprite sheet with our enemy in our texture folder in the content browser. Remember: it must be PNG or TGA format, in power of 2 and, very important, have the alpha channel, or transparency activated. Once you have your texture in the engine, instead of creating a sprite, we are going to extract the sprites.
| Extract Sprites |
From the new menu we will change the Sprite Extract Mode to Grid, and this will open a new section in the bottom of the menu. There change the cell width and height to the values of your image, in my case they were 256x256 each.
| Grid |
Press the green tab Extract in the right bottom corner and this will create one sprite for every individual image in your content browser beside your texture. I like to keep my browser organised and for this I am going to create a folder (right click empty space> New Folder), named as enemy’s sprites, move my enemy’s sprites to this folder and drag this folder to the sprites folder.
| Extracted Sprites |
Now in the enemy sprites Folder, with all these sprites selected together, we will right click in them and select from the menu Create Flipbook and call it enemy_Fb
 |
| Create Flipbook |
You should already see the little icon moving probably very fast, we can adjust this, but first we can create a folder to store all our flipbooks and drag this flipbook there.
Now double click in the flipbook and open the enemy-FB menu. In the details Panel to the right you can adjust the Frames per Second to have a more realistic speed in your character movements
 |
| Frames per Second |
Less frames per second imply less speed. My terrifying spider looks ok to a rate of 7 FPS. Remember to Save.
The Blueprint
We could drag our Flipbook right now into the scene and it would move, but it will remain still in the same place. As I said in the beginning of this tutorial, we are going to duplicate the platform blueprint to create our enemy’s movement towards the character on the game.
 |
| Enemy viewport |
Find your moving platform in your blueprints folder in the content browser and right click to open the menu, select duplicate and name the new blueprint Enemy_BP.
Remember: Save regularly.
First we need to change the Paper sprite the we had originally for the newly created Flipbook. Open the blueprint double clicking on it.
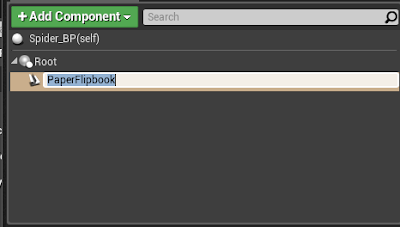
In the Add Component section, to the top left of your screen, delete the Paper Sprite (Just Selected and Backspace)
| Delete PaperSprite in components list |
To the left of your screen, in the details panel, in the sprite section chose your new enemy_FB
 |
| Details Panel. Select Enemy Flipbook |
If you compile and save now you will get a compiling error, but it is very easy to change. Our previous coding had designed as target the platform sprite, but we have change this for an enemy flipbook, so all we have to do is to change those targets to de correct ones. You will get this kind of errors in your graph event.
Just drag from your components list in the left hand of your screen, the flipbook on the blue target node, compile and the error will vanish. I like to have activated in the Compile tab the option “jump to the error node” which is self-explanatory.
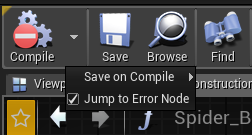 |
| Jump to Error Node |
In the error Set sprite colour change the command for Set sprite colour (flipbook)
| Change to Set Sprite Color (Flipbook) |
Compile and save when you have finish and try your new enemy in your game. Remember to change the Delay and the time in your details panel, to make it work and value 0 in the location Y.
Now we have
the bad guy walking in our platforms as well, but we need to program its
ability to cause damage to our character. There is many ways to do this, don’t get
confuse if you see other ways to do this.
Health System
The first step we are going to give is to create a Health System for our character in our character blueprint. Open the blueprint of your character in your blueprints folder
 |
| Open Character Blueprint |
Now we will create a variable, type float for our health.
 |
| Create Health Variable |
In the Event graph of our character we are going to create a Custom event and we will call this event Heath-Sys. Remember: right click in an empty space of your graph event and type custom event and name it conveniently.
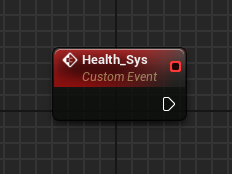 |
| Custom Event: Health_Sys |
 |
| Input Damage |
 |
| Health_Sys Custom Event |
Now we will apply simple maths to this event. Our health minus the damage will set the new health. It makes sense? Ok, drag your variable Health to the graph and select the option set health Connect this to the Event. Now drag again the health and this time choose get. Form the health variable Get drag and type Float-Float. Connect the out node to the Set Health node and the Damage to the remaining node. Your event should look like this.
 |
| Event Graph: Completed Health_Sys |
In the details panel of your variable health , make sure the default value is 1.0
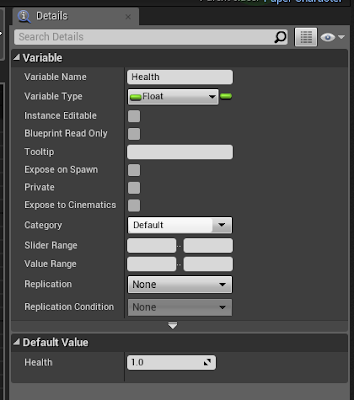 |
| Variable Health Default Value |
We will use this system every time that we want something in the game to cause damage to our character.
Enemy blueprint: Damage
Now we need to tell our enemy how much damage to cause every time they overlap each other.Open the blueprint for your enemy. First thing is first, we are going to make sure all our collision is set as it should because it is one of the most common mistakes that we can overlook:
- Our enemy is in the value 0 in the location Y axis.
- The collision in the details panel of our spider is set to OverlapAll (scroll down if you don’t see it in the panel)
- Finally open your flipbook double click on it and make sure the collision there is also set to Each frame Collision
 |
| Collision Presets |
 |
| Flipbook Collision Source |
All set. Open the enemy blueprint and with the flipbook selected in your components scroll your details panel until you can see the green tabs for the events. There select "On Component Begin Overlap”
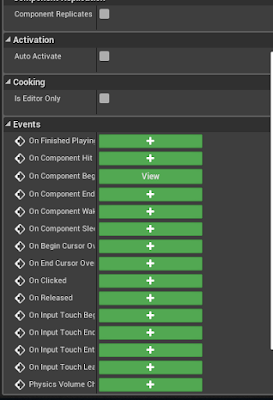 |
| On Component Begin Overlap |
This will send you straight ahead to your Event graph. We want to instruct our enemy to withdraw certain amount of health every time that overlaps our character. Then, first we drag from the exec node of our event and search for our character. We select Cast to 2DSide scroller Character and we also connect the object to the Other Actor node. It should look like this.
 |
| Cast To 2DSideScrollerCharacter |
From the exec node of the 2DSide Scroller we call the Health Sys that we created earlier. And, also, connect the target to the character.
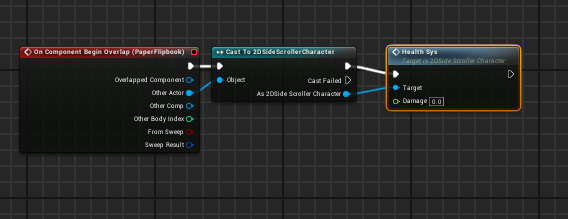 |
| Call the Health_Sys |
Finally type the damage in the input that we want our enemy to cause to the character.
 |
| Damage Value |
In the way that it is right now the spider is causing damage to our character, but we will never know because we have nothing to display this on our screen. We can create a very basic Health bar just for the purpose of testing our health system.
Health Bar
In your UI folder (if you don’t have one, just create it) right click to open the menu and chose the last option from the unfolded menu and, from the new set of options, select again the last option Widget Blueprint. You can call it just for this tutorial Health Bar.
 |
| Create Widget Blueprint |
Double click to open
 |
| Widget Blueprint Canvas |
There, to your left, is the palette. Drag a progress bar to the canvas viewport and scale it. We are not going to focus in this tutorial on designing the HUD, just this simple health bar to test our Health System.
 |
| Progress Bar in Canvas |
You can name this progress bar Health. In the details Panel, in the Progress section, change the percent to 1. This should change the colour of your bar to blue because now the progress bar is full (we have all our health). There are many settings that we can toggle in this details panel, but it would take another complete new tutorial. To program the bar open the tab beside the percentage and select Create Bind. This will send you straight away to the graph of the widget blueprint.
 |
| Binding Progress Bar |
Break the link between the nodes and from the first one lets bring our character: cast to 2d side scroller.
 |
| Cast to 2Dside Scroller Character |
The object has to be also connect to something and it will be the player character, therefore pull the object node and type get player character
And we also need a reference to the health that we will pull from the node of our character.
Adding Health Bar to the Viewport
The last thing that we have to do is to give the instruction of displaying this health bar in our screen and we will do this in the level blueprint. This blueprint opens different to the other ones.
Open the menu from the tool bar in the top of your screen above the viewport and select Open Level Blueprint
 |
| Open Level Blueprint |
There, in the Event Graph, from the event BeginPlay, drag the node and type Create widget and from the class options select the health that you have just created
 |
| Create Health Widget |
The owning player is going to be the player controller, and we want to add this to the viewport. Don’t forget to connect the return value with the target.
 |
| Add Widget to Viewport |
Compile and save.
Lets try now all our health system!!
We take damage, we sort obstacles, we have enemies moving across the platform… to make our game fair we will probably need some pick ups to recover health and to throw things to the enemy to cause him damage and defend our character. Check how to do this in the next tutorial.
My First 2D Game in UE4: The enemies
 Reviewed by Maria Cereijo
on
March 11, 2019
Rating:
 Reviewed by Maria Cereijo
on
March 11, 2019
Rating:

