My First 2D Game in UE4: Getting started
 |
| 2D Game Screenshot |
In this tutorial we are going to make our first contact with Unreal Engine, learn and understand what is in the main tabs of the interface, how to move around and set things ready to start building our First 2D game. In the first contact with the engine you may feel pretty dizzy, but once you understand what everything is, things will get actually very exciting.
New project
Assuming
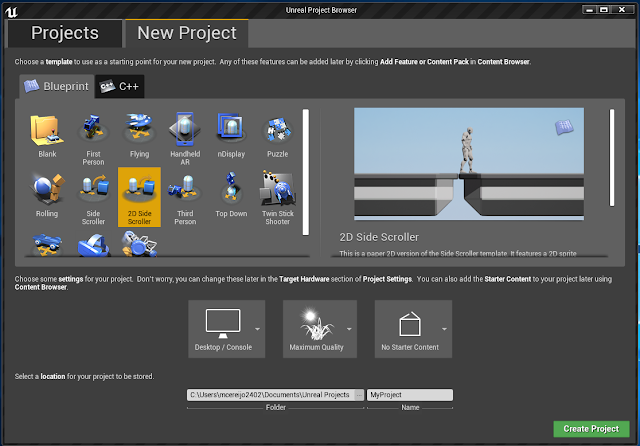
that you already have downloaded and launched Unreal you will get a screen
similar to this one (if this is your first project you will only get the option
New Project).
There we
will choose the template for the 2DSide Scroller as highlighted in the image
and set the options on the settings to Desktop/
Console, Maximum Quality, and No Starter Content (the 3 boxes under the image).
Our game is saved
by default to our Documents folder in a new folder that Unreal has created
inside, and there you will find all the projects that you create. This is handy
to know if you use more that one computer and you need to copy the game to somewhere
else.
Finally, we
have to name our game and it’s important that you know that no spaces are
allowed in the engine. For the purpose of this tutorial I have named mine as
MyTutorialProject.
First time we open our engine
The Viewport
The viewport
is by default in the middle of our screen. There is where all the visual part
of our game take place. There we place our character, the platforms, enemies
and everything that plays a visual roll in the game.
Here our objects
can be selected, copied, scaled, duplicated… We can also navigate in our level,
toggle between perspective view, to top, front or left and right view.
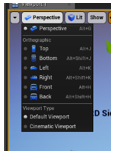
In the top left corner of our viewport we can
see these tabs:
 |
| Toggle view |
From this unfolded menu we will choose front, and, in this view, we will
be most of the time as our game is a 2D game and we won’t need the perspective
view at all. We will need still to use the Y axis, though, but let’s not jump
ahead.
 |
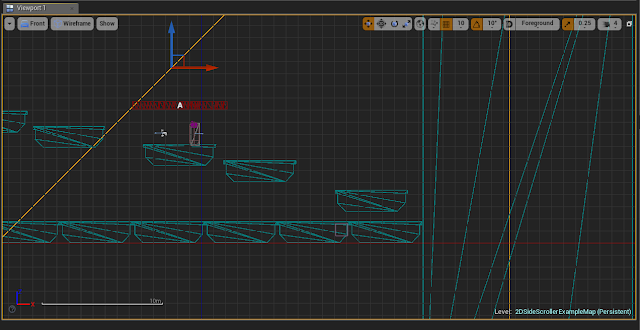
| Wireframe View |
Your view
will probably have changed to something like this. Is nothing to panic about:
the engine has set your view to wireframe too.
To set this
back to our desired view in the same set of tabs where we have changed the view,
we will have a tab that says wireframe. Click
and you will unfold this menu:
 |
| View Mode Panel |
We are going to make our game not too complicated so for
this project we will go unlit.
You may have notice that our gizmo has changed when we toggled to front view, now it
only displays the X and Z direction. Clicking the objects of
the viewport will make the gizmo to move to that object. By default, it’s
setting in select and translate objects
(short cut W). By grabbing the arrows (mouse left) and dragging we will see our
objects moving to where we drag them.
If we hit the space
bar, the appearance of our gizmo will change because this toggles between
the first 4 options of this menu:
 |
| Scale, Move, Rotate |
Here we see among others, the scale (R) and rotate(E)
option. You don’t need to be worrying, in the beginning about any
of the other options of the menu displayed above.
Selecting an object and pressing the back-space key we will delete the object. If you’ve done this accidentally, control +Z will undo the step.
To navigate in Front
view (is different in perspective) we use Mouse Right and Drag to pan the
viewport camera. To make a selection box
use Mouse Left and Drag. To Zoom you
can use the wheel of the mouse or, if you don’t have, press right and left
buttons of the mouse together and drag. Finally, the F key is very handy to focus in a selected object.
World Outliner
Everything
that is placed in your viewport it also has a place in the World Outliner. This is in the top right side of your screen.
You can also
select things in this panel and that will change also in your viewport. The
panel has a search bar to find an object faster. Beside the search bar its also
an icon of a folder that will add new folders to organise your objects.
The
world outliner is very handy when your viewport gets very busy and you can’t
find things, but it is important that you name everything properly and all is conveniently organised.
(A hint to find things in the viewport is to select in the
outliner and press F and the viewport will focus really fast on it).
The Content Browser
Everything
that we use in our game is in our content browser.
 |
| Content Browser |
It’s not the same that the world outliner as the things that we find in our content browser do not link directly with the viewport and the world outliner but is information and assets that sometimes can be dragged several times to our game.
By default,
with the 2DSide Scroller template, we already have some folders and assets in
this content browser.
We are going to need to create some folders to place some of the items that we will be creating so let’s see how to do this by creating a folder to place the User Interfaces of our game. We will create this in our 2DSideScrollerBP folder and to find it we can use the search bar. Let’s type there the name of the folder until you see it and open it.
We are going to need to create some folders to place some of the items that we will be creating so let’s see how to do this by creating a folder to place the User Interfaces of our game. We will create this in our 2DSideScrollerBP folder and to find it we can use the search bar. Let’s type there the name of the folder until you see it and open it.
Right-click inside in an empty space and in the unfolded menu, in the
very top you’ll see and select the option new
folder and we will name it as UI (user
interface), and there we will store all the interfaces that we have not create
yet as the menu screen, pause, game over...
 |
| Unfolded Menu from Content Browser |
Now that we have at last created something for
the game, we can click Save all that
it’s also in the content browser (Save frequently, as the engine can crush
sometimes, mostly if you have many things open at once. Ideally have everything
close in your computer when you are using Unreal).
 |
| Content browser menu |
To the left of the Save tab we have Import. We use this to bring to the engine all the images and assets that we are going to use for our game. Ideally, every image that we bring to the engine has to be in .png or .tga format and the size has to be in power of two (this means that the value in pixels of the image has to respond to the rule 2, 4, 8, 16, 32, 64,… ). We are going to bring an image to use as a background to for our game. The one that is already in is 512 by 512 px, so let's go with that size.
Find or create in photoshop an image that you like, make sure that agrees with the rules that we have already established and save it into your computer (I
recommend you save all your images in a folder that you can create for this
game). Find the folder in the engine called textures
and open it because is there where we want to import our image.
Let’s click Import now and search for your images
in the folders, acept and your image should be now in your content browser.
Now, in
order to replace the background image that is in the viewport by default, we are
going to create a sprite with the image that we have just imported. Right-click on the image and in the
unfolded menu choose sprite actions and then create sprite, and the result
should be that you have a new image underlined in blue right beside the image
that we had imported. We are going to move this new sprite into the sprites
folder. We do this by dragging the image to this folder and selecting the
option move.
Details Panel
We are going
to select the background that was in the viewport by default and speak about
the Details Panel that is the bottom right of your screen.
In the first
section, transform, we can see information about its location, rotation and
scale, and we can modify there the properties. Notice that the value on the Y
location is -441.9. What
is important about this value is that is smaller than 0.
 |
| Transform Section in the Details Panel |
Now select one of the ledges and
you will see that the value in the y
axis in the location is 0. So we could say that in a 2D game in Unreal, we use the Y axis to
order our items in layers and if we want this objects to collide between them
they have to be in most of the cases in the same Y axis value.
Next thing
to notice in the transform panel is
the scale of the background that right now is to 28. If we modify this value to 1 you will see that the
background will became very small. (Ctrl +Z to undo the changes)
The next
section in the details panel is the
sprite information.
Unfold the menu and search for the sprite that we
created with our new background and notice what happens if you select it.
We have replaced the background image for our own image. The image, even when in pixels was the same size, now appears to be bigger.
| Changing pixel per unit |
The image is
smaller and maybe is in the front of your scene, but now you know that you can
modify this in the details panel. Scale it back to 28 in the transform panel
and make sure the y location has a negative value.
We don’t
need to modify the value of pixels per unit because we did this before, and it
has not been changed.
The last
thing that we are going to do in this tutorial is to delete objects from the viewport using the outliner.
Select the
first ledge scroll to the last and pressing shift key click it too. This selects everything
that it’s in between too, press back space on your key board and all will disappear.
You can do the same with the right and left ledge. If you want we can add one ledge back to the scene so our character has a place to stand. Select it from the sprites folder and dragged to the scene. Make sure that the value in the in the Y location is 0 so our character won't fall.
 |
| Adding a Ledge |
The Mode Panel
 |
| Mode Panel |
Don't be concern right now about the mode panel (left top hand of your screen). We are not really going to be using this panel for this game. All you need to know for the 2D game is that you have to be in the Place Mode that is the first tab of the panel.
We are all set to start placing things to interact with our player in the scene. Learn in the next tutorial how to create different sorts of platforms for our 2D game.
 |
| Place Mode |
We are all set to start placing things to interact with our player in the scene. Learn in the next tutorial how to create different sorts of platforms for our 2D game.
My First 2D Game in UE4: Getting started
 Reviewed by Maria Cereijo
on
March 11, 2019
Rating:
 Reviewed by Maria Cereijo
on
March 11, 2019
Rating:


